Brad nail size for baseboard—it’s the key to a flawless, long-lasting installation. Choosing the right size isn’t just about looks; it’s about ensuring your baseboards stay put, avoiding those pesky gaps and wonky lines. This guide breaks down everything you need to know, from selecting the perfect nail to nailing down the perfect placement. Get ready to transform your space with confidence!
Different baseboard materials and wall types require specific brad nail sizes. Understanding these factors will help you avoid costly mistakes and ensure a strong, stable installation. We’ll explore the science behind nail selection, giving you the tools to confidently tackle any baseboard project.
Baseboard Installation Overview

Baseboard installation is a crucial step in interior finishing, providing a clean and finished look to the lower portion of walls. Proper installation ensures a durable and aesthetically pleasing result that complements the overall room design. This process requires careful planning, accurate measurements, and precise execution to avoid costly errors and ensure a professional-looking outcome.Baseboard installation involves attaching these decorative strips to the walls and floors to create a seamless transition between the two.
The process generally begins with preparation, followed by precise measurements and cuts, and finally, the secure attachment to the wall and floor. The choice of fastening method (nails or screws) depends on the type of baseboard and the desired level of strength and durability. Careful alignment is essential to ensure a uniform and aesthetically pleasing finish.
Baseboard Installation Steps
The typical baseboard installation process follows a series of steps, beginning with preparation and concluding with finishing touches. Accurate measurements and precise cuts are essential to achieve a uniform appearance.
Preparation
Before commencing the installation, thoroughly prepare the area by removing any obstacles, dust, or debris. Ensure the wall surface is clean and free from any loose paint or other imperfections that could affect the adhesion of the baseboard. Verify that the wall is properly leveled and the floor is stable.
Measurements and Cutting
Accurate measurements are critical for a successful installation. Use a measuring tape to determine the length and width of each baseboard section. Carefully mark the cutting lines on the baseboard, ensuring precision. Use a sharp utility knife or a miter saw to make clean cuts at the marked lines. Consider the angles at corners and plan for mitered cuts to ensure a smooth transition.
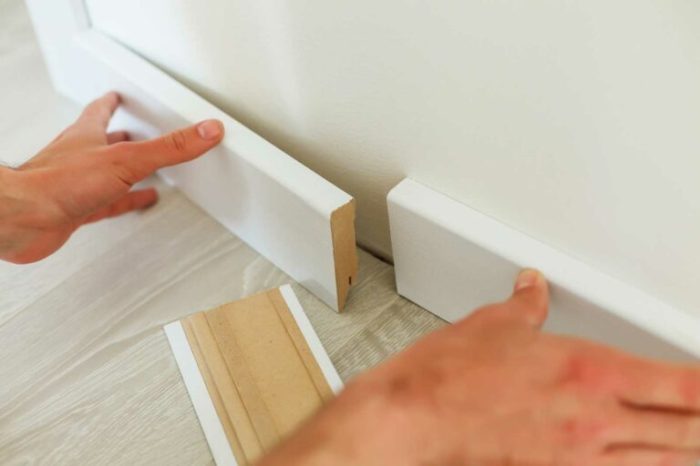
Securing the Baseboards
Several methods exist for securing baseboards to the wall and floor. The most common methods include using nails or screws. Nails are suitable for lighter baseboards, while screws provide greater stability and strength, especially for heavier or more demanding installations. Consider the type of baseboard material and the desired level of security when selecting the fastening method.
Use appropriate fasteners for the specific material of the baseboard.
Alignment and Finishing
Proper alignment is crucial for a professional finish. Use a level to ensure the baseboard is perfectly horizontal. Adjust the baseboard as needed to achieve precise alignment. After securing the baseboard, check for any gaps or unevenness. Fill any gaps with caulk or putty to create a seamless and smooth finish.
Determining the appropriate brad nail size for baseboard installation requires careful consideration. Factors such as the baseboard material and the wall type influence the optimal nail choice. While researching this, one might also consider the local food sales tax regulations, such as those in Indiana, which can impact the cost of construction materials and labor. food sales tax in indiana Ultimately, selecting the correct brad nail size ensures a secure and aesthetically pleasing finished product.
Tools for Baseboard Installation
| Tool | Purpose | Description | Image Description |
|---|---|---|---|
| Measuring Tape | Measuring lengths | Precise measurement tool | A flexible tape measure with a metal or plastic body, a pointed end, and markings. The tape should be positioned straight and tight against the surface to ensure accurate readings. |
| Level | Ensuring straight lines | For precise horizontal and vertical measurements. | A tool with a bubble that indicates a level plane. Position the level on the baseboard to check for level alignment, ensuring the bubble is centered. |
| Utility Knife | Cutting baseboard | For making clean cuts on baseboard material. | A knife with a replaceable blade for precise cuts. The blade should be sharp to ensure clean and precise cuts without splintering or tearing the baseboard. |
| Miter Saw | Precise angle cuts | For creating angled cuts, especially at corners. | A power tool that allows for precise angled cuts. The saw’s blade should be sharp and adjusted to the correct angle for accurate mitered cuts. |
| Hammer | Driving nails | For driving nails into the wall or floor. | A tool used to strike nails, ensuring they are driven straight and firmly into the material. |
| Screwdriver | Driving screws | For driving screws into the wall or floor. | A tool used to turn screws, ensuring they are tightened securely into the material. |
Nail Size Selection Criteria
Choosing the right brad nail size for baseboard installation is crucial for a strong, lasting, and aesthetically pleasing finish. Proper nail selection ensures that the baseboard is securely fastened without causing damage to the wall or the baseboard itself. Incorrect nail size can lead to premature failure and necessitate costly repairs.Selecting the appropriate brad nail size hinges on several key factors.
Considerations include the baseboard material, the wall type, and the desired level of fastening strength. Understanding these factors allows for a more informed decision and prevents issues like nail pulling or baseboard damage.
Factors Influencing Nail Size Choice
Baseboard material significantly impacts the appropriate nail size. Different woods, like pine, fir, oak, and maple, have varying densities and strengths. Denser woods require larger-gauge nails to ensure proper penetration and holding power. Similarly, the wall type, whether drywall or plaster, influences the nail selection. Drywall is typically thinner and less dense than plaster, necessitating a different approach to fastening.
Relationship Between Nail Size and Baseboard Material
The density of the baseboard material directly correlates with the required nail size. Harder woods, like oak or maple, necessitate stronger, larger-gauge nails to prevent them from pulling out. Softer woods, such as pine or fir, can be effectively fastened with smaller-gauge nails. This consideration is vital to avoid weakening the baseboard or damaging the wall.
Comparison of Different Brad Nail Sizes
Various brad nail sizes offer differing strengths and weaknesses. Larger nails, while providing greater holding power, might be more likely to damage the wall, especially drywall. Smaller nails, on the other hand, may not provide sufficient strength for denser baseboard materials. Careful evaluation of the specific baseboard and wall types is essential.
Impact of Wall Type on Nail Selection
Wall type significantly influences nail size selection. Drywall, being a thinner material, is more susceptible to damage from larger-gauge nails. Plaster, being denser and more substantial, can often accommodate larger nails without compromising its integrity. Choosing the correct nail size prevents damage to the wall surface and ensures secure fastening.
Nail Size Comparison Table
| Nail Size | Length (in mm) | Gauge | Suitable Baseboard Material | Suitable Wall Type |
|---|---|---|---|---|
| 2-inch brad | 50mm | 18 | Pine, Fir (softer woods) | Drywall |
| 1-inch brad | 25mm | 16 | Oak, Maple (harder woods) | Plaster |
| 1.5-inch brad | 38mm | 18 | Medium-density woods (e.g., birch) | Drywall, light plaster |
This table provides a general guideline. Always prioritize careful assessment of the specific baseboard and wall materials for optimal results.
Nail Placement and Spacing
Proper nail placement is crucial for a strong and aesthetically pleasing baseboard installation. Incorrect spacing or placement can lead to weak points, premature failure, and a less-than-desirable finished look. Careful consideration of nail spacing and placement along the baseboard’s length is essential for a long-lasting installation.Accurate spacing and placement of nails ensure the baseboard remains securely affixed to the wall, preventing sagging, warping, or detachment over time.
This method also avoids the risk of damaging the wall surface or the baseboard itself. Adhering to these guidelines results in a stable and durable baseboard installation.
Recommended Nail Spacing
Nail spacing is critical for maintaining structural integrity and preventing the baseboard from shifting or detaching. A consistent spacing pattern allows for even distribution of force, minimizing stress on any single nail or section of the baseboard. Unevenly spaced nails will create a weak point, increasing the likelihood of damage.
While considering the appropriate brad nail size for baseboard installation, it’s important to note that meticulous planning is key. For detailed insights into historical architecture and interior design, exploring the various tours offered at the Illinois Governor’s Mansion, available at illinois governor’s mansion tours , can offer valuable inspiration. Ultimately, the correct brad nail size for the project will depend on the specific baseboard material and desired aesthetic, ensuring a secure and visually appealing installation.
- For standard baseboards, aim for a spacing of approximately 8 to 12 inches between nails. This provides a good balance between structural support and aesthetic appeal.
- In areas with high-traffic or potential stress points, such as corners or areas near doors and windows, reduce the spacing to 6 to 8 inches to enhance support.
- For thicker baseboards, or those made from more dense materials, slightly closer spacing might be necessary to maintain stability. Consult the manufacturer’s guidelines if unsure.
Nail Placement Along the Baseboard
Strategic nail placement along the baseboard’s length ensures even distribution of weight and stress. This technique prevents warping or bowing of the baseboard. A consistent pattern is key to a professional-looking installation.
- Start by placing nails at the baseboard’s midpoint and then proceed toward the ends. This even distribution of force helps prevent sagging or bending.
- For corners and joints, place nails more frequently to strengthen these areas. Consider using a small nail or screw at the corner’s edge to reinforce the attachment.
- Avoid placing nails too close to the baseboard’s edges to prevent splitting or cracking. Aim for at least an inch away from the edge.
Avoiding Over-Driving Nails
Over-driving nails into the wall can damage the drywall, leading to cracking or other imperfections. This damage can compromise the wall’s structural integrity and potentially impact the baseboard’s longevity. A damaged wall also affects the appearance and longevity of the entire installation.
- Use a nail set to carefully set the nail head flush with the baseboard surface. This ensures a smooth finish and prevents damage to the wall.
- If the wall is made of a plaster or other delicate material, use a smaller-diameter nail or a different fastening method to avoid damage.
- Regularly check the depth of the nail to ensure it is not being driven too far. Overdriving may require the use of a nail puller to remove the nail and repair the wall.
Impact on Baseboard Longevity
Correct nail placement and spacing directly affect the longevity of the baseboard installation. A well-installed baseboard will last for many years without needing replacement.
- Evenly spaced nails distribute stress effectively, minimizing the risk of cracking, splitting, or sagging over time.
- Proper placement avoids damage to the wall, ensuring the baseboard remains securely attached and the wall remains intact.
- Adhering to these guidelines ensures a robust and aesthetically pleasing installation that will endure for years.
Diagram of Optimal Nail Placement, Brad nail size for baseboard
Imagine a baseboard, represented by a horizontal line. Nails are depicted as small vertical lines spaced approximately 8-12 inches apart, with slightly closer spacing near corners. The nails are all evenly driven into the wall, ensuring a flush finish. The diagram illustrates the even distribution of nails along the length of the baseboard.
Troubleshooting Baseboard Installation
Baseboard installation, while seemingly straightforward, can sometimes present unexpected challenges. Understanding common issues and their solutions is crucial for achieving a professional-looking and structurally sound installation. This section delves into troubleshooting techniques, enabling you to identify and rectify problems that may arise during or after baseboard installation.
Common Baseboard Installation Issues
Identifying potential problems early in the installation process can save time and effort. Knowing the common issues that arise during baseboard installation helps prevent costly rework and ensures a smooth, professional-looking final product. Here are some of the most frequent problems:
- Nails pulling out: Loose or improperly driven nails can lead to a wobbly or unstable baseboard, particularly in areas with high traffic or vibrations. This can compromise the integrity of the installation and cause the baseboard to shift over time.
- Gaps between baseboards and walls: Uneven walls, variations in baseboard length, or insufficient wall preparation can result in gaps. This not only detracts from the aesthetic appeal but also can create areas for dust and drafts to accumulate.
- Uneven baseboard heights: If the baseboards are not installed to the same height, the final look will be compromised. This is especially noticeable when the baseboards meet at corners or in other visible areas.
- Baseboard damage: During installation or after, baseboards can sustain damage from impact or improper handling. This could be scratches, dents, or breaks that require repair or replacement.
Troubleshooting Methods
Effective troubleshooting involves identifying the root cause of the problem and applying appropriate solutions. This section Artikels methods for addressing common baseboard installation issues.
- Nails pulling out: Instead of simply hammering more nails, consider using construction adhesive in addition to the nails. This provides extra support and helps prevent future issues. Apply a generous bead of construction adhesive to the back of the baseboard where the nail will be driven, and then drive the nail. For particularly problematic areas, consider using longer nails or specialized fasteners.
If the baseboard is already installed, use a putty knife to carefully fill the gaps around the pulled-out nails with wood filler. Sand smooth and repaint to match the existing baseboard.
- Gaps between baseboards and walls: Addressing gaps requires careful assessment. Ensure the wall is properly prepared. Use shims to level the baseboard and fill any gaps with wood filler. Sand the filler smooth, and then prime and paint to match the wall. If the gap is significant, consider using a wider baseboard or making additional adjustments to the wall.
- Uneven baseboard heights: Ensure accurate measurements are taken before installation. Using a level and shims, adjust the baseboard height to achieve uniformity. If the problem persists, recheck measurements and ensure the baseboard is correctly aligned with the wall.
- Baseboard damage: Minor scratches or dents can often be repaired using wood filler. Apply the filler to the damaged area, sand smooth, and repaint to match. For more significant damage, consider replacing the damaged baseboard section.
Step-by-Step Guide to Fixing Common Problems
A systematic approach to fixing baseboard problems ensures accuracy and efficiency. This guide provides a step-by-step approach to rectifying common issues.
- Identify the problem: Carefully examine the baseboard installation to pinpoint the specific issue.
- Gather necessary materials: Acquire the appropriate tools and materials, such as nails, wood filler, putty knife, sandpaper, and paint.
- Prepare the affected area: Clean the area around the problem, removing any debris or loose materials.
- Apply the solution: Follow the specific troubleshooting method Artikeld in the previous section for the identified problem.
- Finalize the repair: Sand the repaired area smooth and prime and paint to match the existing baseboard, if needed.
Final Review
So, there you have it—a complete breakdown of brad nail size for baseboard. From choosing the right size to nailing down the perfect placement, this guide equips you with the knowledge to install stunning baseboards with ease. Remember to consider the material, wall type, and spacing for optimal results. Now go forth and create a beautiful, well-maintained space!
Detailed FAQs: Brad Nail Size For Baseboard
What’s the best way to prevent nails from pulling out?
Using the correct size brad nail for your baseboard and wall type is crucial. Also, ensure proper spacing between nails and avoid over-driving them. If you’re still concerned, consider using a stronger adhesive in addition to nails.
How do I determine the right spacing between nails?
The spacing should be even and consistent, generally about 6-8 inches apart. Adjust based on the baseboard’s length and thickness. A visual guide, like the diagram in the article, will help.
What if my baseboards are uneven after installation?
Uneven baseboards often stem from improper measuring or leveling. Recheck your measurements, ensure your baseboards are level, and adjust accordingly. Sometimes, additional support or shimming may be necessary.
