
How to bleed a car radiator is a crucial skill for any car owner. A properly functioning cooling system is essential for optimal engine performance and longevity. This guide provides a step-by-step approach, ensuring you’re equipped to handle this task with confidence and efficiency. From identifying the bleed valve to troubleshooting common issues, we’ll walk you through the entire process, ensuring your vehicle stays cool and running smoothly.
Understanding the intricacies of your vehicle’s cooling system is key to successful radiator bleeding. This involves knowing the specific location of the bleed valve for your car model and the necessary safety precautions to avoid potential hazards. Proper preparation, the correct tools, and a systematic approach are crucial to a smooth and successful radiator bleeding procedure.
Introduction to Radiator Bleeding
Radiator bleeding is a crucial maintenance task for any vehicle owner. Ignoring this simple procedure can lead to overheating issues, reduced fuel efficiency, and even engine damage. A properly functioning cooling system is vital for maintaining optimal engine temperature, ensuring longevity, and maximizing performance.The car radiator is the heart of the cooling system. It’s a heat exchanger that absorbs heat from the engine’s coolant, transferring it to the surrounding air.
This process allows the engine to operate within its safe temperature range. A properly filled and purged cooling system is critical for effective heat dissipation, preventing overheating. Air trapped within the cooling system impedes this process, leading to decreased efficiency and potentially serious consequences.
Why is Radiator Bleeding Necessary?
Air pockets in the cooling system can hinder the coolant’s ability to circulate efficiently. This disruption leads to localized overheating, particularly in areas where air is trapped. The coolant’s effectiveness is significantly reduced, as air does not absorb or transfer heat. Over time, this can lead to serious engine damage.
Function of a Car Radiator and Cooling System
The radiator’s primary function is to dissipate heat from the engine’s coolant. The cooling system circulates this coolant, absorbing heat generated by the engine and transferring it to the radiator. The radiator then releases this heat into the surrounding air. This cycle is essential for maintaining optimal engine temperature, preventing overheating and damage.
Role of Air in the Cooling System
Air trapped in the cooling system disrupts the smooth flow of coolant. This air acts as an insulator, reducing the coolant’s ability to absorb and transfer heat effectively. Consequently, the engine temperature may rise, causing performance issues, and ultimately damage. Understanding how air impacts coolant flow is crucial for effective radiator bleeding.
Common Signs Indicating the Need for Radiator Bleeding
Several indicators suggest that the cooling system needs bleeding. Noticeable signs include a fluctuating temperature gauge, an unusually high operating temperature, inconsistent coolant levels, and an audible hissing sound from the radiator cap or hoses. These symptoms often point to trapped air in the system, requiring immediate attention.
Tools and Materials Typically Required
The tools and materials required for radiator bleeding are generally straightforward. These include a radiator bleed valve key, a container to catch the coolant, a funnel, and a coolant recovery tool. The specific tools might vary based on the vehicle make and model. Always consult your vehicle’s owner’s manual for specific recommendations.
Radiator Bleeding Procedures by Vehicle Type
| Vehicle Type | Typical Procedure |
|---|---|
| Passenger Cars | Typically, bleeding involves opening the bleed valve, allowing air to escape, and refilling the system. |
| SUVs | Similar to passenger cars, but may involve more extensive coolant flushing or specific procedures based on the cooling system design. |
| Trucks | Larger cooling systems may require specialized tools and procedures, often involving more coolant volume and potentially more complex steps. |
Identifying the Bleed Valve

Locating the bleed valve is a crucial first step in effectively bleeding a car radiator. Improper identification can lead to wasted time and frustration, and potentially, further issues within the cooling system. Knowing the valve’s precise location and visual characteristics is vital for a smooth and successful bleeding process.The bleed valve, a small, strategically placed component, is designed to release trapped air from the radiator system.
Its proper functioning is essential for ensuring efficient heat transfer and preventing overheating. Different vehicle models employ various designs and placement strategies for this valve. Careful observation is key to identifying the valve accurately.
Bleed Valve Location Variations
Understanding the diverse locations of bleed valves across different car makes and models is crucial for a successful radiator bleed. Different manufacturers employ varying strategies in their design, requiring a thorough understanding of the specific vehicle to identify the valve.
- Many modern vehicles utilize a bleed valve positioned near the top of the radiator, often accessible from the engine compartment. This location provides easy access and straightforward operation. In such cases, the valve might be situated on the upper radiator hose connection, a critical point for air release.
- Some older models might have the bleed valve situated on the top of the engine block, near the thermostat housing. This necessitates careful inspection and access to the valve, possibly requiring the use of tools for better reach.
- Vehicles with more complex cooling systems might have the bleed valve integrated into a larger assembly or positioned in a less visible location. A detailed understanding of the vehicle’s specific layout and schematic is essential for successful identification in these instances.
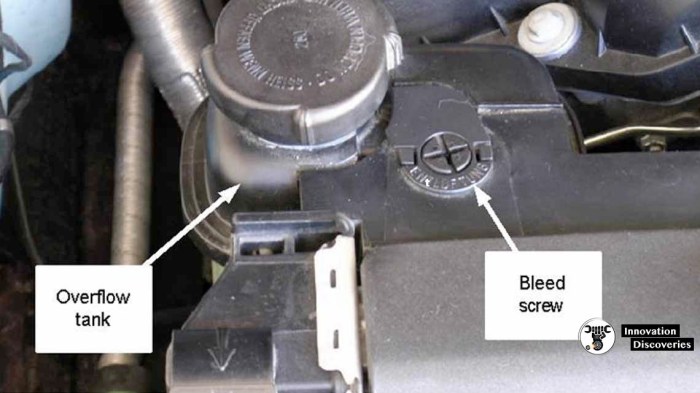
Visual Characteristics of the Bleed Valve
Accurate identification of the bleed valve relies on recognizing its visual characteristics. The valve’s appearance and features provide valuable clues for proper location.
- Shape: The bleed valve often takes the form of a small, circular or hexagonal cap, sometimes with a threaded portion. Its shape serves a functional purpose, allowing for effective air release.
- Size: The size of the bleed valve typically varies depending on the vehicle’s design. Small and compact valves are common in modern vehicles, while larger valves might be present in older models.
- Color: The color of the bleed valve may be similar to the surrounding components or stand out as a contrasting color. A noticeable color contrast can enhance visibility and aid in identification. This can vary from vehicles to vehicles.
Bleed Valve Function Explained
The bleed valve plays a critical role in the cooling system’s operation. It is designed to release trapped air, ensuring optimal radiator performance.
The bleed valve acts as a one-way valve, allowing air to escape from the system while preventing coolant from leaking out.
The valve’s function is essential to ensure the system operates efficiently, preventing overheating issues.
Comparison of Bleed Valve Locations
This table illustrates the potential variation in bleed valve locations across different makes and models.
| Make and Model | Typical Bleed Valve Location |
|---|---|
| 2015 Honda Civic | Top of the radiator, on the upper radiator hose connection |
| 2010 Toyota Camry | Top of the engine block, near the thermostat housing |
| 2018 Ford Fusion | Integrated into a larger coolant reservoir, requiring detailed inspection |
Locating the Bleed Valve in a 2015 Honda Civic, How to bleed a car radiator
The bleed valve on a 2015 Honda Civic is typically located on the upper radiator hose connection. Refer to your vehicle’s owner’s manual or online resources for the most accurate and detailed information specific to your vehicle. This valve is easily accessible from the engine compartment, providing straightforward operation. Always ensure the engine is cool before performing any radiator work.
Preparing for the Bleeding Process
Proper preparation is paramount for a successful radiator bleed. Ignoring these steps can lead to wasted time, frustration, and potentially damaging the cooling system. Careful attention to safety and thorough system preparation are crucial for efficient and safe radiator bleeding.Thorough preparation minimizes potential hazards and ensures the process is completed effectively. This involves understanding the specific steps, ensuring the right tools are available, and prioritizing safety throughout the procedure.
A well-thought-out approach maximizes the chances of a smooth and successful bleed.
Safety Precautions
Safe practices are essential during radiator bleeding. Improper handling of fluids or tools can lead to burns, chemical exposure, or even mechanical injuries. Adherence to safety protocols safeguards both the individual performing the procedure and the vehicle itself.
- Wear appropriate personal protective equipment (PPE), including safety glasses, gloves, and long sleeves. This protects you from splashes of coolant, potential burns, and other hazards.
- Work in a well-ventilated area. Coolant contains chemicals that can be harmful if inhaled. Good ventilation helps mitigate this risk.
- Ensure the vehicle is securely parked on a level surface, with the parking brake engaged. This prevents accidental movement during the procedure.
- Disconnect the negative terminal of the battery. This prevents electrical hazards and potential short circuits.
Safety Equipment
A list of necessary safety equipment is presented below to enhance safety and minimize risks.
- Safety glasses or goggles protect your eyes from coolant splashes and other debris.
- Gloves protect your hands from coolant and potential sharp edges. Choose sturdy, chemical-resistant gloves for added protection.
- Long sleeves prevent burns from hot components and coolant.
- Work gloves provide a better grip and enhance safety during the process.
- A pair of work gloves will protect your hands from coolant and potential sharp edges. Choose gloves that are sturdy and resistant to chemicals.
Tools for the Process
The right tools are critical for a successful and efficient radiator bleed. Improper tools can cause damage to the vehicle’s cooling system or make the procedure unnecessarily difficult.
- A radiator bleed tool or a suitable wrench is needed to access and operate the bleed valve.
- A container for collecting the drained coolant is necessary. Use a sturdy container that can hold the coolant safely.
- A funnel facilitates the addition of new coolant.
- A coolant recovery system is useful for extracting coolant safely and efficiently.
Cooling System Drainage
Proper draining of the cooling system is essential before bleeding. A partially drained system can cause air pockets to form during the bleeding process, leading to inefficiency and potential issues.
- Locate the drain plug on the radiator and the lower hose. Consult your vehicle’s manual for the precise location.
- Position a suitable container beneath the drain plug to collect the drained coolant.
- Open the drain plug and allow the coolant to drain completely. Observe the coolant to assess its condition.
- Once the coolant has drained, close the drain plug securely.
Checking Coolant Level and Condition
Verifying the coolant level and condition is crucial before proceeding with the bleed. Incorrect coolant levels or quality can cause various problems in the cooling system.
- Check the coolant reservoir for the correct level, ensuring it’s within the marked range. Refer to your vehicle’s owner’s manual for the specific levels.
- Assess the coolant’s color and consistency. Discolored or overly thick coolant indicates a need for replacement.
- Inspect the coolant for any unusual particles or sediment. The presence of these elements suggests that the coolant needs to be changed.
The Radiator Bleeding Procedure
Mastering the art of radiator bleeding is crucial for optimal engine performance and preventing potential complications. A properly bled radiator ensures efficient coolant circulation, which is vital for maintaining engine temperature and overall system health. Ignoring this process can lead to overheating, reduced efficiency, and costly repairs down the line.The radiator bleeding process involves systematically removing trapped air pockets from the system, allowing coolant to flow freely through all components.
This ensures a smooth and efficient heat exchange process, ultimately maintaining the engine’s temperature within the ideal range. Correct execution is paramount to avoiding potential issues.
Step-by-Step Bleeding Procedure (Traditional Method)
The traditional method of radiator bleeding is a straightforward process. Thoroughness is key to success. This method is widely used and generally reliable.
- Locate the bleed valve, ensuring you’ve identified it correctly. Open the hood and locate the bleed valve on the top of the radiator. Ensure it’s accessible for proper operation.
- Prepare a container to catch the coolant. A small, shallow container is sufficient. Position it beneath the bleed valve to collect any drained fluid.
- Open the bleed valve slowly. Use a wrench or appropriate tool to carefully open the bleed valve. This allows the trapped air to escape. Monitor the flow of coolant into the container.
- Close the bleed valve once the flow of coolant becomes steady. The coolant should flow smoothly, indicating the air has been expelled. Tighten the valve completely to prevent leakage.
- Repeat the process if necessary. In some instances, repeated opening and closing of the bleed valve might be required to remove all trapped air pockets.
- Check coolant levels. Once you’ve completed the process, verify the coolant level in the radiator reservoir. Top up if needed to maintain the appropriate level. Maintaining the correct level is crucial for the radiator’s functionality.
Different Methods of Radiator Bleeding
Various methods are available for bleeding radiators. Each method has its own advantages and disadvantages.
- Traditional Method: This method involves opening and closing the bleed valve to release air pockets. It’s generally straightforward, but it may require multiple repetitions. This is a time-tested method, suitable for most vehicles. The potential drawback lies in the possibility of coolant loss if not handled meticulously.
- Pressure Method: This method uses pressure to force the air out of the system. It typically involves connecting a pressure source to the system. This method can be faster but requires specialized tools and knowledge. It is often more efficient, but it demands care to avoid over-pressurization.
Technique for Opening and Closing the Bleed Valve
Proper technique is essential for opening and closing the bleed valve. Careful handling prevents leaks and ensures efficiency.
- Use the appropriate tools to open and close the bleed valve. Use a wrench or other tool suited for the specific valve design to avoid damage or leaks. Ensure you are using the right size wrench or tool for your application.
- Open the valve gradually. Avoid sudden movements or excessive force to prevent coolant loss or damage to the valve. Open the valve slowly to allow the air to escape gradually.
- Close the valve securely. Once the coolant flow is consistent, close the valve completely and tightly to prevent leakage. Ensuring the valve is tightly closed prevents coolant loss and ensures the system’s integrity.
Monitoring Coolant Levels
Maintaining coolant levels is essential during the bleeding process. Monitoring coolant levels is crucial for the radiator’s performance and longevity.
- Check the coolant level regularly. Use the reservoir to gauge the level of coolant. Top up if needed to maintain the appropriate level. This will ensure that the system is functioning properly and will prevent potential damage.
- Do not overfill. Overfilling the radiator can lead to leaks or damage to the system. Ensure you are maintaining the correct level. Overfilling the radiator is just as detrimental as not having enough coolant.
Potential Issues and Solutions
Several issues might arise during the bleeding process. Troubleshooting these problems is vital for maintaining the radiator’s performance.
- Coolant leaks: Ensure all connections are tight and that the bleed valve is properly closed. If leaks persist, check for loose connections or damaged components. Address any leaks immediately to avoid further issues.
- Air pockets persist: Repeatedly open and close the bleed valve to remove remaining air pockets. If the problem persists, inspect the system for blockages or other issues. Ensure the system is clear of any blockages that might be trapping air.
- Coolant level drops unexpectedly: Inspect for leaks. Check all connections and the bleed valve. Identify and repair the leak promptly to prevent overheating and damage.
Comparison of Bleeding Methods
| Method | Advantages | Disadvantages |
|---|---|---|
| Traditional | Simple, readily available tools, cost-effective | Time-consuming, potential for coolant loss |
| Pressure | Faster, effective for stubborn air pockets | Requires specialized tools, potential for over-pressurization |
Troubleshooting Common Issues
Radiator bleeding, while often straightforward, can sometimes present unexpected challenges. Understanding potential problems and their solutions is crucial for a successful and efficient cooling system. This section details common issues encountered during the bleeding process and provides practical solutions to get your vehicle’s engine running smoothly.
Potential Problems During the Bleeding Process
Identifying and resolving issues during radiator bleeding is essential for optimal engine performance. Problems can arise from various sources, including air pockets, leaks, and faulty components. Understanding the causes and symptoms of these problems allows for quick and accurate diagnosis.
- Air Pockets in the System: Air pockets are a common occurrence during the bleeding process. They disrupt the flow of coolant, leading to uneven cooling and potentially overheating. Air pockets can form due to inadequate bleeding procedures, insufficient coolant volume, or incorrect valve operation. Addressing these issues promptly is key to preventing engine damage.
- Leaks: Leaks in the radiator system, hoses, or coolant reservoir can hinder the bleeding process. Coolant loss can lead to a loss of pressure, making it difficult to remove trapped air. Leaks may manifest as a slow drip, a constant stream, or a significant puddle beneath the vehicle. Proper diagnosis and repair of leaks are essential to prevent further damage and ensure efficient cooling.
- Faulty Bleed Valve: A malfunctioning bleed valve can prevent the escape of trapped air. This can result in a persistent air pocket in the system, despite repeated attempts to bleed the radiator. A stuck or damaged bleed valve may require replacement for proper operation.
Identifying and Resolving Leaks or Air Pockets
Efficient identification of leaks or air pockets is crucial for effective radiator bleeding. Visual inspection and systematic testing are key to finding the source of the problem.
- Visual Inspection: Thoroughly examine the radiator, hoses, coolant reservoir, and connections for any signs of leaks. Look for drips, puddles, or dampness around these components. Pay close attention to areas where connections meet. A slow leak might not be immediately obvious, so look for subtle signs of moisture.
- Coolant Level Check: Monitor the coolant level in the reservoir. A significant drop in coolant level could indicate a leak, and in the absence of a leak, low coolant can also be the cause of an air pocket. Maintaining the correct coolant level is vital for efficient cooling.
- Air Pocket Detection: When air is trapped in the system, you may notice a reduced coolant flow during the bleeding process. Consistent bubbling or no flow from the bleed valve despite applying pressure suggests an air pocket. Careful observation of the system’s behavior is essential for accurate identification.
Common Mistakes to Avoid During the Bleeding Procedure
Avoiding common mistakes is key to a successful radiator bleeding process. These errors can lead to prolonged troubleshooting and potentially damage the cooling system.
- Insufficient Coolant: Insufficient coolant volume can result in air pockets. Ensure the system is adequately filled to the correct level to prevent air from entering.
- Incorrect Bleeding Technique: Using the wrong technique or not allowing the system to fully pressurize can result in air pockets. Proper bleeding techniques are critical to success.
- Ignoring Warning Signs: Ignoring early warning signs, such as a noticeable reduction in coolant level, can exacerbate the issue and potentially lead to engine overheating.
Causes of Continued Air in the System After Bleeding
Continued air in the system after bleeding could stem from several factors. A thorough analysis is necessary to identify the root cause.
- Incorrect Bleeding Sequence: A sequence that is not followed in a proper order may lead to the continued presence of air. Proper sequence is critical to effectively remove all trapped air.
- Faulty Bleed Valve: A malfunctioning bleed valve is another common cause of continued air in the system. A stuck or damaged bleed valve will prevent the escape of trapped air. Replacing the valve may be necessary to resolve this issue.
- Blockages in the System: Blockages in the radiator or hoses can hinder the flow of coolant and contribute to continued air pockets. A blockage may necessitate a thorough inspection of the cooling system for obstructions.
Identifying and Fixing a Problem with a Faulty Bleed Valve
Diagnosing a faulty bleed valve is crucial for a proper radiator bleeding process. A malfunctioning valve can result in the system retaining air, causing various cooling problems.
- Valve Inspection: Visually inspect the bleed valve for any signs of damage, corrosion, or debris. A jammed or clogged valve will prevent proper functioning. Proper inspection can reveal the cause of the problem.
- Replacement of the Bleed Valve: If the bleed valve is faulty, replacement is the most effective solution. Replacing a faulty bleed valve will restore proper air release, allowing for optimal cooling system performance.
Maintaining the Cooling System
Proper maintenance of your car’s cooling system is crucial for its longevity and performance. A well-maintained cooling system ensures optimal engine temperature, preventing overheating and costly repairs down the line. Ignoring these preventative measures can lead to significant issues, such as engine damage and reduced fuel efficiency. By following these steps, you can keep your cooling system healthy and your engine running smoothly.Regular maintenance involves more than just periodic checks.
It’s about understanding the critical components and the importance of proactive measures to prevent potential problems. A proactive approach to cooling system maintenance translates to a more reliable and efficient vehicle.
Coolant Checks and Replacements
Regular coolant checks are essential for maintaining the cooling system’s effectiveness. Coolant is the lifeblood of your cooling system, preventing overheating and protecting your engine. The coolant’s primary role is to absorb heat from the engine and carry it away to the radiator, where it’s dissipated into the atmosphere. Regular monitoring and timely replacements are vital for optimal performance.
Insufficient coolant levels can lead to overheating and potential engine damage.
- Inspect coolant levels regularly, checking the reservoir. Low levels indicate a need for a refill. Always use the manufacturer’s recommended coolant type for your vehicle.
- Replace coolant according to the vehicle’s maintenance schedule, typically every 30,000 to 50,000 miles or as specified in the owner’s manual. Coolant degrades over time, losing its effectiveness in preventing corrosion and heat transfer. Replacing it with fresh coolant restores these properties.
Coolant Types and Suitability
Understanding coolant types is essential for selecting the correct fluid for your vehicle. Different coolants are designed for specific applications and environmental conditions. Omitting this step can lead to corrosion, damage, and reduced efficiency.
| Coolant Type | Suitability |
|---|---|
| OAT (Organic Acid Technology) | Excellent performance in a wide range of temperatures, often preferred for modern vehicles due to its extended life. |
| HOAT (Hybrid Organic Acid Technology) | Offers a balance of performance and extended life compared to other types, providing a good option for most vehicles. |
| Glycol-based (such as ethylene glycol) | A common type of coolant, but may require more frequent replacements than newer technologies. May not be as environmentally friendly as other types. |
Coolant Disposal
Proper disposal of old coolant is crucial for environmental protection. Improper disposal can lead to environmental contamination. Always follow local regulations for safe disposal of hazardous materials.
- Never pour old coolant down the drain. It’s a hazardous substance that can damage the environment and harm aquatic life.
- Contact your local recycling center or auto parts store for information on proper coolant disposal procedures.
- Dispose of the coolant in accordance with local environmental regulations.
Hoses and Connections Inspection
Regular inspection of hoses and connections is vital for preventing leaks. Leaks can lead to coolant loss and engine overheating. Early detection of leaks can prevent more significant problems.
- Visually inspect all hoses and connections for any signs of damage, cracks, or leaks. Look for any unusual discoloration, swelling, or bulging. This proactive step can help identify potential issues before they escalate.
- Pay close attention to areas where hoses connect to the radiator, water pump, and heater core. These are common points for leaks.
Radiator Cap Functionality
The radiator cap plays a critical role in maintaining the pressure within the cooling system. A faulty radiator cap can lead to coolant loss and engine overheating. Ensure the cap is functioning properly.
- Check the radiator cap for any signs of damage or leaks. Inspect the sealing mechanism for proper function.
- Replace the radiator cap if it shows any signs of damage or leaks.
Maintenance Check Frequency
Regular maintenance checks are crucial for the longevity and efficiency of your cooling system. Following a schedule for these checks will allow you to address issues before they become significant problems.
- Inspect coolant levels and condition at every oil change or as specified in your vehicle’s owner’s manual. This frequency ensures the coolant is adequately monitored and maintained.
- Visually inspect hoses and connections at every scheduled maintenance visit or as needed, depending on the vehicle’s usage and conditions.
Closure: How To Bleed A Car Radiator
Mastering the art of bleeding a car radiator empowers you to maintain your vehicle’s cooling system effectively. By following the detailed steps Artikeld in this guide, you can identify and address potential issues, ensuring optimal engine performance. Remember regular maintenance and proactive troubleshooting are key to preventing future problems and keeping your vehicle running smoothly. With this knowledge, you can confidently tackle this important task, saving time and money in the long run.
User Queries
What are the common signs that indicate the need for radiator bleeding?
Overheating, reduced engine performance, and unusual noises from the engine are all common signs that trapped air in the cooling system needs to be released. Also, a low coolant level can be a symptom.
What kind of safety equipment should I have when bleeding a car radiator?
Eye protection, work gloves, and appropriate clothing are essential. Always ensure the area is well-ventilated and that you work in a safe and stable environment. Additionally, use caution with any potential hot parts.
What should I do if I encounter a leak during the bleeding process?
Immediately stop the procedure. Identify the source of the leak and take appropriate steps to address it. If the leak is significant, seek professional assistance.
How often should I replace the coolant in my car?
Coolant replacement schedules vary depending on the vehicle manufacturer’s recommendations. Refer to your owner’s manual for specific guidelines.